Sunday, August 30, 2009

BBQ Ribs

I've never made ribs before today. We live in a city known for it's BBQ so if we want to eat ribs we just drive down the road, there are tons of BBQ joints to pick from! Andrew is a rib eating fool and Abbott has recently started liking ribs too so I thought I would give it a try. It wasn't very difficult and they turned out really good!! The meat pulled right off the bone and the sauce made the ribs sticky and delicious! I marinated them overnight and put them in the oven during breakfast, by lunch time we had more ribs than we could eat! Then we had a Pirates of the Caribbean marathon (they said I needed a break from 17 Again), it was a fantastic Sunday!

Ingredients
4 pounds pork ribs (I used pork back ribs)
3/4 cup brown sugar
1 teaspoon Lawry's seasoning salt
1 teaspoon garlic powder
1/2 teaspoon ground red pepper
2 cups favorite BBQ sauce (I used Sweet Baby Rays)

Directions
You are supposed to peel off the tough membrane that covers the bony side of the ribs, but I couldn't figure it out... so I left it on and all was a-ok (if you're like me and can't figure it out, no worries). Mix together sugar and spices to make the dry rub. Apply the rub and lay the ribs on 2 layers of foil, bony side down. Now squirt a little of the BBQ sauce on top of the ribs (maybe a cup of sauce total). Lay 2 layers of foil on top of ribs and roll and crimp edges tightly, edges facing up and seal. Now put them in the fridge and let them marinade in the rub and sauce for at least 4-6 hours (I marinated them overnight). When their done marinating place the foiled ribs on a baking sheet or baking dish, in case the foil leaks you may want to put a 2nd pan in the rack below your ribs to catch drips (I had a couple drips). Bake at 300 degrees for 3 hours. Take them out of the oven and uncover the top of the ribs. They don't look very appetizing right now. You need to baste on some more BBQ sauce (around a cup of sauce), leave the foil off, and put them back in the oven and set to broil. Broil the sauced ribs for for 5 minutes, the sauce will sizzle and caramelize under the broiler, so it sticks to the ribs!

Thursday, August 27, 2009

Chad's Sesame Ginger Grilled Chicken Salad

** Remember to click on the pictures for full screen view ;-)
My brother-in-law Chad is a really good chef (for further proof check out Chad's Steak). I am a good cook, I can follow a recipe like it's nobodies business. Chad creates his own recipes though, it's craziness! Justin has similar skills he just isn't allowed to use them... he tries to taste and add ingredients (I discourage this because he makes everything spicy)! So, last week Justin got a text picture from Chad, it was this beautiful salad! Justin actually thought they went out to eat without us and were rubbing it in! I should have known... Chad made the salad, it was just a recipe he thought up! We made it tonight and it was amazing!! It was fairly healthy too, with only a few tablespoons of dressing and cheese! It fed the four of us without any side dishes, I can't wait to make it again!

Ingredients
Corn Pico de Gallo
3/4 can of whole kernel sweet corn
1 1/2 medium size JalapeƱo peppers
2 romano tomatoes chopped
2 tablespoons cilantro
1 tablespoon chopped parsley (I didn't have any so I omitted it)
2 tablespoons orange juice
1 1/2 tablespoons red-wine vinegar (I only had white-wine vinegar)
1 teaspoon ground cumin
1 teaspoon chili powder

Sesame Ginger Grilled Chicken
1 pound boneless chicken breast
Lawry’s Sesame Ginger Marinade (I couldn't find this particular marinade so I used Lawry's Baja Chipotle)

Salad Mix
Do Not Use Iceberg Lettuce in bags!!!!
1 head of fresh green lettuce, chopped
1 head of fresh romaine lettuce, chopped
4 tablespoons Kraft Parmesan Romano Dressing (I couldn't find this either so I got Kraft Caesar dressing)
Shredded Colby cheese and Parmesan Cheese

Directions
Prepare Pico in a medium bowl; combine the corn, peppers, tomatoes, cilantro, parsley, orange juice, vinegar, cumin, and chili powder. Stir well then chill for 30 min.

Marinade the chicken for 45 min., meanwhile start charcoal in grill. Make sure when you grill you position charcoal to one side of grill so that you have a hot side and a cool side. When top part of coals get white hot put chicken on cool side of grill; cook and flip chicken every 5 min. for about 20 min. (depending on how hot you have your grill.) Make sure chicken is white in the middle, but be careful you don’t overcook!

Mix Salad and dressing together, add about 1/2 a cup of Colby cheese, then top with chopped grilled chicken, add 1/2 cup of pico mixture, then top the salad off with shredded Parmesan cheese and enjoy!

Tuesday, August 25, 2009

Abbott's Spaghetti Tacos

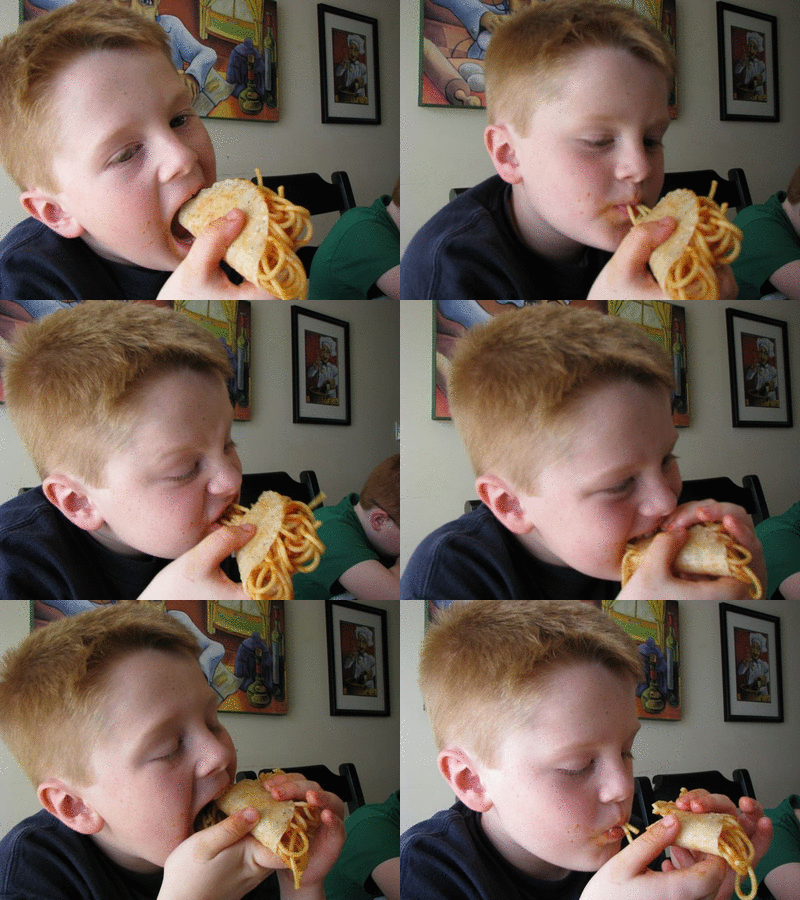
Abbott loves the Nickelodeon TV show iCarly and on the TV show Carly's favorite dinner is spaghetti tacos. So Abbott's been asking for them for awhile now, I finally gave in. Justin and I had a lot of trepidation but they were actually pretty good! In fact... Justin's sitting beside me and when he saw the spaghetti taco pictures he went "Mmm... those were good"!
If your serving dinner to an elementary school child who watches Nickelodeon then surprise him/her with spaghetti tacos, you won't be sorry!

Ingredients (is this really necessary?)
Spaghetti Noodles, cooked
Spaghetti Sauce
Taco Shells (I got the white corn shells)

Directions
Mix the spaghetti noodles and sauce in a big bowl. With a fork twirl the noodles and put them into the taco shells. We cooked our taco shells but I don't know if it really made a difference. I know photo directions aren't needed for this recipe but watching Abbott eat his spaghetti taco just made me smile. I love him so much it hurts! This is my first animated GIF of Abbott eating his taco (for email readers, I think this will only work on my website).create avatar
Create avatar

Sunday, August 23, 2009

Andrew's First Concert Pie

This pie is a little overdue. We took Andrew to see Green Day at the Sprint Center on August 12th (the day before school started... we are officially the most irresponsible parents ever). Justin and I have been listening to Green Day since we were Andrew's age and Andrew has grown up listening to their new cd's as well as our old cd's. The concert was amazing! I mean really jaw dropping, dancing like a crazy person, singing at the top of your lungs amazing! No one can captivate an audience like Billie Joe Armstrong! I am so glad we got to experience this with Andrew!

I knew we had to make a pie for Andrew. I mean your first concert is almost as eventful as your first kiss! I needed something green, for Green Day... but more importantly I needed something that tastes like a first concert! Something with a little bite, something new and unusual, yet exciting! Key Lime Pie, perfect!

Ingredients
A pre-made (or bought) graham cracker crust
4 large egg yolks
1 (14-ounce) can sweetened condensed milk
1/2 cup Fresh Key (or regular) lime juice (from about 5 regular limes or 10 key limes)
1 teaspoon Lime Zest
Whipped Cream (I dyed my whipped cream green and piped spikes)

Directions
Beat the egg yolks and lime zest at high speed until thick and pale. Reduce the mixer speed to low and beat in the condensed milk. Still on low, add half of the lime juice. When it is incorporated, add the remaining juice, again mixing until it is blended. Bake the pie for 12 minutes at 350 degrees. Transfer the pie to a cooling rack and cool for 15 minutes, then freeze the pie for at least 1 hour. Serve with whipped cream and garnish with lime zest or lime wedges.

Friday, August 21, 2009

Individual Potato Gratins

This has been a long, hard week and our dinners have suffered (it was our first full week of school)! We had frozen pizza and fast food all week except for these beauties with some BBQ chicken! This recipe is from Melissa d'Arabian, winner of The Next Food Network Star. I am a sucker for food based reality TV like The Next Food Network Star and Top Chef! Don't let the picture fool you, this is an awesome recipe!! I forgot to invert the gratins onto the plate so mine don't look very appealing but they were fantastic! Not to mention, you only need two potatoes to make 6 individual gratins! Don't count on each person only eating one though, we each had 2 and the boys came back and devoured the leftovers later that evening!

Ingredients
Vegetable spray
2 large russet potatoes, peeled and thinly sliced
1/2 cup grated Swiss cheese (or a different cheese if you prefer)
2 green onions, finely chopped (I omitted these)
Salt and pepper
3/4 cup heavy cream (I didn't have any cream so I used butter)

Directions
Spray 6 muffin tins with vegetable spray. Layer potato slices and cheese into each muffin cup. Season with salt and pepper and top each gratin with 1 or 2 tablespoons of heavy cream (or in my case 1/2 tablespoon butter). Cover with foil and bake for 30 to 40 minutes at 375 degrees, removing the foil halfway through cooking time. Invert gratins onto plate and serve.

Tuesday, August 18, 2009

Toasted Tomato, Mozzarella and Basil Sandwich

School started last week, here's this year's "first day of school" picture (we weren't able to get a picture of both the boys genuinely smiling)...
The boys were hilarious, getting up at 6am wasn't something they were prepared to handle. They had school 2 days last week but crashed all 3 nights by 7pm. So Justin and I had a couple dinners on our own! We were starving when we made these sandwiches and they were SO good! Justin said he loved how fresh they tasted! We inhaled them while standing over the sink...I laugh because when the boys are gone I think we will abandon our table to eat all our meals over the sink (it's weird how we like to hover there).
** Update- a friend told me this is actually a "Caprese Sandwich", shows you how much I know ;-)

Ingredients
1 loaf French or Italian bread
1 carton of cherry tomatoes
6 fresh basil leaves, chopped
4 ounces fresh mozzarella cheese, sliced
2 cloves of garlic, minced
Olive oil

Directions
Slice the tomatoes in half and place them cut-side up in a baking dish. Sprinkle with a generous pinch of salt and pepper. Cook for 30 minutes at 350 degrees. The tomatoes will be soft and a little shriveled when they are done. Slice the loaf of bread into two equal portions. Then, slice each portion in half lengthwise and rub the bread with olive oil. Spoon the tomatoes onto one side of the bread and sprinkle with basil and garlic. Lay on the mozzarella slices! Place sandwiches, open faced, into a 350 degree oven for 5-10 minutes, until bread is crispy and cheese is melted. When they come out of the oven, fold the top over and press down - the olive oil will soak into the bread and form a natural “dressing” for the sandwich. Serve warm.

Saturday, August 15, 2009

Blueberry Cobbler

Blueberries were on sale at the supermarket this week! I excitedly put some in our cart and asked Justin if he wanted blueberry pancakes, blueberry muffins, or blueberry cobbler. With his eyes half-closed and smiling, Justin said “Mmmm, blueberry cobbler…”! I could have made this recipe in a pie plate, but what fun is that?! I love using these individual ramekins that I got on sale at target for a dollar... A DOLLAR!!

Blueberry Filling Ingredients
1 carton of fresh blueberries (around 1 and 1/2 cups of blueberries)
1/2 Cup Sugar
1 tablespoon lemon juice
1/3 cup water
Biscuit Ingredients
1 cup all-purpose flour
2 teaspoons baking powder
1/2 teaspoon salt
3 tablespoons butter
1/2 cup milk

Directions
Add all of the ingredients for the blueberry filling into a large skillet. Boil the berries over medium heat for 10-15 minutes until the mixture has thickened a little. Meanwhile, combine all the dry ingredients for the biscuits. Using a pastry cutter or a fork, cut the butter into the dry ingredients. Add the milk to the dry mixture to form a soft biscuit dough. The consistency is pretty forgiving, a slightly too-soft or too-firm dough won’t make a difference in the final product. As long as it holds together, but is soft enough to break apart into clumps, you’re good to go. You can just break the dough into clumps but I was just standing around waiting on the blueberries so I went ahead and cut mine. For one large cobbler:
Pour the blueberry filling into a pie plate. Break the biscuit dough up into small, bite-sized pieces. Place the pieces on top of the hot berries. Place in the oven to bake at 400 degrees for 20 minutes. Serve warm.

For individual cobblers:
Transfer blueberry filling to individual ramekins or gratin dishes, filling only half-full (I was only able to get 3 ramekins out of the filling). Add biscuit mixture on top. Place all the cobblers on a baking sheet (this will help you take them out of the oven with burning yourself). Bake at 400 degrees for 20 minutes, serve warm.
Here’s what my individual cobblers looked like before baking... ... and here it is after baking! These are great just as they are, but you can also serve them with some ice cream if you want. I could barely get a picture snapped before digging in! I wish you could smell this! Oh yeah, it was delicious!

Monday, August 10, 2009

Cheese Omelet

I work with the spunkiest gal named Samantha, I love her! Way back in December we were talking about food, I had just posted a recipe where I mentioned my inability to make omelets. Sam explained how she makes omelets and convinced me that it isn't difficult. That conversation planted a seed, so I started reading up and watching videos of people making omelets. Well... I've been making omelets for months now. I can't believe we lived without them for so long! I usually just add cheese since that's what my boys like. If you want to add veggies I suggest that you saute them before adding them to the omelet, I add my sauteed veggies at the same time I add my cheese. Before I get to explaining the directions lets talk pans. I have these awesome stainless steel pans but they are useless for omelets, the egg permanently fuses to the pan! You have to use a non-stick pan! My mother-in-law got me a square pan from Walmart for my birthday and it has become my "omelet pan", it works great but a non-stick circle pan would work well too!

Ingredients
1 tablespoon butter
2 large eggs
salt and pepper
Cheese, whatever kind you like!

Directions
Set you stove to medium heat, don't go above medium or the eggs will get that yucky brown crust! Melt the butter in your pan and spread it around so that the entire pan (including corners) is greased. Scramble your two eggs together in a bowl. Pour the eggs in the middle of the pan... ...then pick up the pan and roll the eggs around to the corners so that the entire pan is covered. Now leave it alone and let it cook, it will take around 2-5 minutes. You will know it's ready when the eggs shrink away from the sides of the pan and you touch the eggs and can't find any raw liquid. Sprinkle the eggs with salt, pepper, and your cheese. I fold in the sides first. Then, I just start rolling the eggs up like a burrito. It really is easy, I don't know why I spent years cowering at the thought of making an omelet.

Saturday, August 8, 2009

Tuna Pasta Salad

I love cold tuna pasta salad but it smells up my house. I wish canned tuna didn't smell so bad, it tastes so good! I know this is lame, but I can't wait for fall so our TV shows are back. We've spent the summer watching Friends reruns, which happens to be the best TV show ever by the way!

Ingredients
12 ounces pasta shells or macaroni, cooked and drained
12 ounces canned tuna, drained
1 cup chopped celery
1 cup frozen green peas, cooked
1 1/2 cups Miracle Whip
Salt and pepper

Directions
Combine the cooked and drained pasta with the drained tuna, chopped celery, peas, and mayonnaise, using only enough mayonnaise for the salad to be creamy. Chill at least 1- 2 hours before serving.

Wednesday, August 5, 2009

Pizza Pockets

The Taco Pockets were such a hit I thought I would try making the pockets again but with pizza flavors! The boys all loved the pepperoni and cheese pockets, they dunked them in marinara sauce. The options for filling these pockets are so endless, I love using the thin crust pizza dough! Now, I didn't eat these pizza pockets. I don't like pepperoni, but lets just say it's because I was making good decisions on my diet. So hows the diet going you ask? I've lost zero pounds and Justin's lost 5... I swear he just thinks of losing weight and it falls off him. Don't feel sorry for me though, I spent the last 4 days at the lake eating out every day and gorging myself on omelets and muffins :-)

Ingredients
1 (11-ounce) can refrigerated thin-crust pizza dough
Mozzarella cheese, sliced or shredded
Pepperoni, slided
Optional Ingredients
Sprinkling of Salt, Parmesan cheese, and Italian seasoning
Marinara sauce for dipping

Directions
Roll the pizza dough out onto your pan with non-stick foil or cooking spray. With a pizza cutter divide the dough into four sections. Layer the pepperoni and cheese. I did as many layers that I could fit when I folded the dough up in the middle, it turned out to be 3 layers of pepperoni and cheese. Fold the ends of the dough over the pepperoni and cheese. Use a fork to crimp the sides together. When they are all filled, folded, and crimped. Sprinkle with some salt, Parmesan cheese, and Italian seasoning. Bake at 425 degrees for 12 minutes or until browned.